This page is a quickstart how-to guide for the Vpp-Agent
You will learn how to:
- Install Vpp-Agent
- Install and use the ETCD and Kafka
- Run the Vpp-Agent container
- Interact with Vpp-Agent
1. Prerequisites
- Docker (docker ce installation manual)
- Postman or cURL tool (postman installation manual)
- ETCD
- Kafka
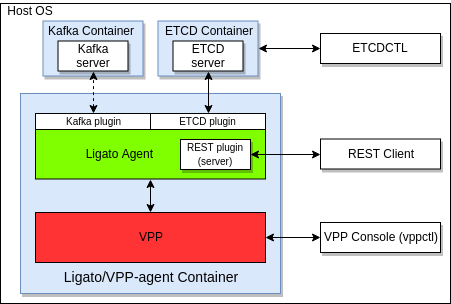
The result of this guide prepares following topology:
2. Get the agent image from the dockerhub
The command will download the Vpp-Agent image (Vpp-Agent + compatible vpp) from the dockerhub:
docker pull ligato/vpp-agent
or for the development image:
docker pull ligato/dev-vpp-agent:dev
The command docker images shows us that the image exists:
REPOSITORY                  TAG                 IMAGE ID            CREATED             SIZE
ligato/vpp-agent            latest              17b7db787662        18 hours ago        175MB
The docker ps should not mention vpp-agent in the output, since we did not start the image yet.
3. Prepare the ETCD
3.1 Get the ETCD image
The following command starts the ETCD in a docker container. If the image is not present on your local machine, docker will download it first:
docker run -p 2379:2379 --name etcd --rm quay.io/coreos/etcd:v3.1.0 /usr/local/bin/etcd -advertise-client-urls http://0.0.0.0:2379 -listen-client-urls http://0.0.0.0:2379
Verify that the ETCD container is running; type docker ps -f name=etcd:
CONTAINER ID        IMAGE                        COMMAND                  CREATED             STATUS              PORTS                              NAMES
f3db6e6d8975        quay.io/coreos/etcd:v3.1.0   "/usr/local/bin/etcd…"   16 minutes ago      Up 16 minutes       0.0.0.0:2379->2379/tcp, 2380/tcp   etcd
3.2 Install the ETCD client
The etcdctl is the official ETCD client which can be used to put/delete/read data from the ETCD:
// Linux users
apt-get install etcd-client

// MAC users
brew install etcd
According to ETCD documentation, the etcdctl API version must be set. We must use Version 3:
export ETCDCTL_API=3
Verify that the following command does not print any error:
ETCDCTL_API=3 etcdctl get --prefix /vnf-agent
Check the ETCD version (also prints the version of the API):
ETCDCTL_API=3 etcdctl --version
4. Start Kafka
The following command starts Kafka in a docker container. If the image is not present on your local machine, docker will download it first::
docker run -p 2181:2181 -p 9092:9092 --name kafka --rm --env ADVERTISED_HOST=172.17.0.1 --env ADVERTISED_PORT=9092 spotify/kafka
Verify that the Kafka container is running; type docker ps -f name=kafka:
CONTAINER ID        IMAGE               COMMAND             CREATED             STATUS              PORTS                                            NAMES
dd9bb1a482c5        spotify/kafka       "supervisord -n"    25 seconds ago      Up 24 seconds       0.0.0.0:2181->2181/tcp, 0.0.0.0:9092->9092/tcp   kafka
Note: VPP-Agent v2.0.0 (not released yet) and later do not need kafka running by default.
5. Start VPP-Agent
The following command starts the VPP-Agent together with a compatible version of the VPP in a new docker container:
docker run -it --rm --name vpp-agent -p 5002:5002 -p 9191:9191 --privileged ligato/vpp-agent
Or, you can start the development image (used for developing VPP-Agent code):
docker run -it --rm --name vpp-agent -p 5002:5002 -p 9191:9191 --privileged ligato/dev-vpp-agent:dev
Verify that the VPP-Agent container is running; type docker ps -f name=vpp-agent:
CONTAINER ID        IMAGE               COMMAND                  CREATED             STATUS              PORTS                                            NAMES
77df69266072        ligato/vpp-agent    "/bin/sh -c 'rm -f /…"   26 seconds ago      Up 25 seconds       0.0.0.0:5002->5002/tcp, 0.0.0.0:9191->9191/tcp   vpp-agent
6. Manage the VPP-Agent
This section is divided into several parts:
- how to configure the VPP providing data to Vpp-Agent
- how to read VPP configuration asking Vpp-Agent
- how to obtain the status (stored in the ETCD) provided by Vpp-Agent
- how to connect to the VPP cli and verify the configuration
6.1 Configure VPP using VPP-Agent
In this step we configure a simple loopback interface with an IP address by putting interface key-value data into ETCD:
ETCDCTL_API=3 etcdctl put /vnf-agent/vpp1/config/vpp/v2/interfaces/loop1 '{"name":"loop1","type":"SOFTWARE_LOOPBACK","enabled":true,"ip_addresses":["192.168.1.1/24"]}'
Let’s add a bridge domain:
ETCDCTL_API=3 etcdctl put /vnf-agent/vpp1/config/vpp/l2/v2/bridge-domain/bd1 '{"name":"bd1","forward":true,"learn":true,"interfaces":[{"name":"loop1"}]}'
Verify that the configuration is present in the ETCD:
ETCDCTL_API=3 etcdctl get /vnf-agent/vpp1/config/vpp/v2/interfaces/loop1
ETCDCTL_API=3 etcdctl get /vnf-agent/vpp1/config/vpp/l2/v2/bridge-domain/bd1
The output should return the data configured.
6.2 Read the VPP configuration via the Vpp-Agent API
This command returns the list of VPP interfaces accessing the Vpp-Agent REST API:
curl -X GET http://localhost:9191/dump/vpp/v2/interfaces
Two interfaces are returned in the output - the loopback interface with internal name loop0 present in VPP by default, and the loopback interface that we configured in the previous step.
Another command to read the bridge domain:
curl -X GET http://localhost:9191/dump/vpp/v2/bd
URLs can be used to get the same data via postman:
http://localhost:9191/dump/vpp/v2/interfaces
http://localhost:9191/dump/vpp/v2/bd
6.3 Read the status provided by the Vpp-Agent
VPP-Agent publishes interface status to ETCD. Get the status for the loop1 interface (configured in 5.1):
ETCDCTL_API=3 etcdctl get /vnf-agent/vpp1/vpp/status/v2/interface/loop1
Output:
{"name":"loop1","internal_name":"loop0","if_index":1,"admin_status":"UP","oper_status":"UP","last_change":"1551866265","phys_address":"de:ad:00:00:00:00","mtu":9216,"statistics":{}}
Note the internal_name assigned by the VPP as well as the if_index. The statistics section contain traffic data (received/transmitted packets, bytes, …). Since there is no traffic at the VPP, statistics are empty.
Note: state is exposed only for interfaces (including default interfaces).
7. Connect to VPP in the Vpp-Agent container
The following command opens the Vpp-Agent container console:
docker exec -it vpp-agent bash
Following command opens the VPP-cli:
vppctl -s localhost:5002
Output:
    _______    _        _   _____  ___
 __/ __/ _ \  (_)__    | | / / _ \/ _ \
 _/ _// // / / / _ \   | |/ / ___/ ___/
 /_/ /____(_)_/\___/   |___/_/  /_/

vpp#
The cli is ready to accept VPP commands. For example, command show interface or sh int shows configured interfaces:
vpp# show interface
              Name               Idx    State  MTU (L3/IP4/IP6/MPLS)     Counter          Count
local0                            0     down          0/0/0/0
loop0                             1      up          9000/0/0/0
vpp#
We can see the default local0 interface and loop0 configured by Vpp-Agent.
The command sh br shows the configured bridge domain:
vpp# sh br
  BD-ID   Index   BSN  Age(min)  Learning  U-Forwrd   UU-Flood   Flooding  ARP-Term   BVI-Intf
    1       1      0     off        on        on        drop       off       off        N/A
vpp#
As alternative, without entering the Vpp-Agent console, the following are short version of commands:
docker exec -it vpp-agent vppctl -s localhost:5002 sh int
docker exec -it vpp-agent vppctl -s localhost:5002 sh int addr
docker exec -it vpp-agent vppctl -s localhost:5002 sh br
Troubleshooting
VPP-Agent container was started and immediately closed.
ETCD or Kafka containers are not running. Please verify that they are running using docker ps.
etcdctl returns “Error: 100: Key not found”.
The etcdctl API version was not correctly set. Check the output of the appropriate environment variable with command echo $ETCDCTL_API. If the version is not set to “3”, set it with export ETCDCTL_API=3.
The cURL or Postman command to access Vpp-Agent API does not work (connection refused).
The command starting the VPP-Agent docker container exports port 9191 to allow access from the host. Make sure that the VPP-Agent docker container is started with the parameter -p 9191:9191.
The cURL or Postman command to access VPP-cli does not work (connection refused).
The command starting the VPP-Agent docker container exports port 5002 (the VPP default port) to allow access from the host. Make sure that the Vpp-Agent docker container is started with parameter -p 5002:5002.